Peel and Stick Wallpaper is a popular choice for temporary projects or rooms ready for a little added flourish. Read and review these installation instructions carefully as you prepare your walls for a successful installation. Spoonflower Peel and Stick Removable Wallpaper is a Type I, PVC-free paper with a non-toxic, self-adhesive backing suitable for low to moderate traffic areas. Peel and Stick Wallpaper has a woven-linen texture, matte finish, and is tear-resistant. It is ideal for short-term (up to one year) use in homes, including rentals, and other temporary projects like event spaces and DIY crafts.
Preparation
Supplies
Paint and Primer:
- Eggshell, Satin, Semi-Gloss are preferred finishes
- Do not use washable, scrubbable or No-VOC paints
- Painted or primed walls must dry for at least 30 days before installation. Install your wallpaper to a surface that is a solid, light color. We have not tested the installation of this substrate over other wallpaper, or on other paper that has also been primed over.
Other Tools:
- Olfa box-style cutters or similar, and blade receptacle
- Straight edge tool, like a metal ruler
- Squeegee or hard smoother tool (included with all orders of rolls)
Wall Preparation
Make sure the walls are smooth, clean, dry, and free of mold, mildew, grease, or other stains. On new walls, drywall joints should be taped, mudded, and sanded smooth. Remove any nail heads, nicks, gouges, and other surface imperfections. Old wallcoverings must be removed, and residual moisture content of the wall should be < 4%. Remove switch and socket covers, and window treatment hardware.
If priming walls, follow the paint and primer recommendations provided above in the "Supplies" section. Painted or primed walls must dry for at least 30 days before installation.
Note: Any slight wall texture may inhibit full adherence for this type of wallpaper. Some common examples of textured walls are shown below (Orange Peel, Knockdown, and Popcorn). You can find out more in Choosing the Best Wallpaper.
Not suitable for high moisture areas such as bathrooms with showers or bathtubs. Walls with washable, scrubbable or No-VOC paints are not recommended and may not allow for strong bonding of wallpaper to the wall. To promote better adhesion under these conditions:
- Create a solution of 30% isopropyl alcohol and 70% water
- Wipe solution over entire wall with a clean, lint-free rag
- Allow to dry completely
- Install a Test Swatch to confirm longevity prior to placing a larger order
Paper Preparation
Allow the wallpaper to acclimate under clean, dry, and protected conditions between 70° F to 75° F (21°C – 24°C) and 40–55% RH until the supplies adjust to the environment. Inspect all materials prior to installation for the following: print scale and size of panels are correct, color matching of panels is acceptable, print surface is free from defects, and edges have enough space for overlap.
- Unroll each roll to face the same way. The top of each panel has no white space. The bottom has a narrow line of white space printed with order information:

- Each roll is labeled with its item number ("Quantity- 1 of 8, etc...). This number is not an installation order. Rolls of the same design may be installed in any order.
- Loosely re-roll each panel starting from the bottom so that the top edge is on the outside of the roll. Do not trim your paper before hanging.
Installation
Hanging the Wallpaper
Hanging wallpaper is a two-person job. Find a meticulous friend to help and plan to complete the installation in one day to ensure a steady and consistent hand. Do not crease the printed paper face prior to or during installation, as creases may not disappear.
Lay out the area to be covered as appropriate for the wallpaper to be hung. Double check the pattern and color to ensure they are correct. When installing...
- across one, two or three walls, start hanging at the farthest left or right corner and continue in one direction until you are done.
- on all four walls, the final panel may not align seamlessly with the first. To reduce visual disconnect, hang the first panel at an inconspicuous point in the room, such as behind an open door or taller piece of furniture.
IMPORTANT: If your installation space contains different wall heights, we still recommend ordering all rolls according to the tallest wall height. Purchasing and installing rolls of different lengths can be very tricky, as you may experience issues aligning the patterns due to the vertical design repeat. Please review How Spoonflower Wallpaper Prints for more information before determining your final order.
Peel away 6” (15cm) of the backing liner and crease liner (not printed face) flat backwards. Place a few inches of the exposed adhesive in place with at least 1-2" of the paper above the top edge of the wall. Start in the middle of the panel and adhere to the wall. Using a squeegee or other smoothing tool, work out air pockets and bubbles in small 4-6” segments evenly, being careful not to scratch the printed design. Keeping the panel flat to the wall, continue to peel the backing liner in small sections downward, repeating the smoothing process until you reach the bottom of the panel. Peel and Stick can be repositioned during the installation process; slowly peel the paper from the wall and reapply.
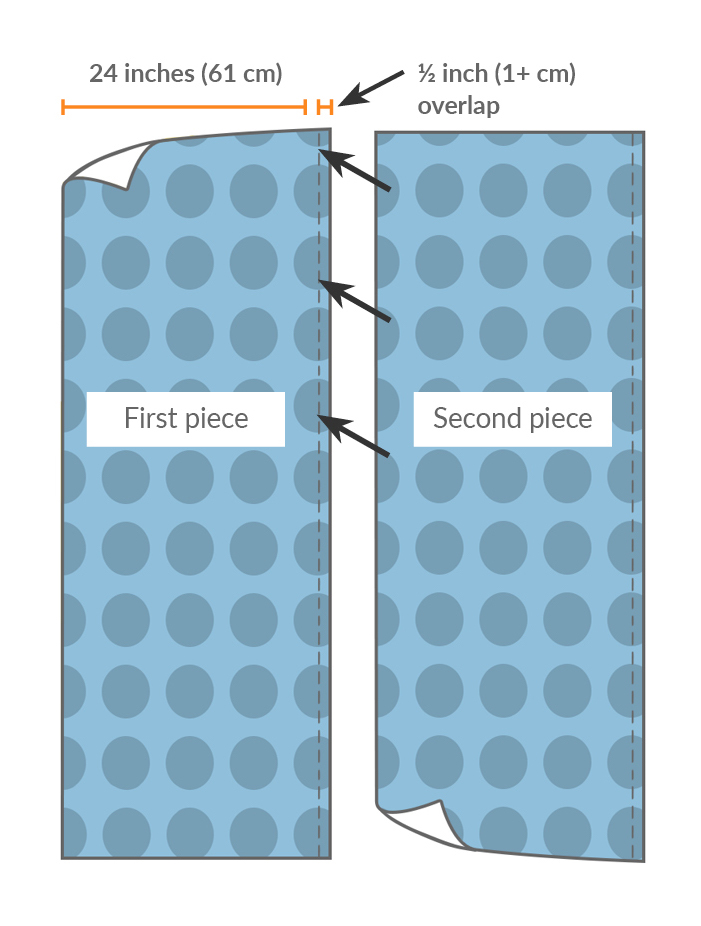
Align and install additional panels as needed for design match with approximately .5” (1+cm) overlap, as shown in the graphic below. The overlap may vary from roll to roll, so be mindful and visually match the design repeat. Installing around interior and exterior corners can be challenging. Rather than trimming right into the corner, it is easier to control installation so that at least a few inches of paper will wrap around any corners. Stop the installation if there is a question about panel color matching and contact Spoonflower.
Trimming the Excess
Once all panels are in place, trim the edges with a sharp, fresh blade. We often recommend a snap off knife with good stability, such as the Olfa SAC-1 Graphic Cutter. Using a straight edge at the ceiling, across baseboards and vertically down corners will ensure a straight cut without edge walking. Dispose of any paper backing properly, as it is not recyclable.
Need more help?
If you are having trouble with your installation or discover a product defect, please discontinue work and contact our Customer Support team. We are typically available 9 am to 5 pm Eastern Time on business days (M-F).
Removal
Temperature, humidity, and wall preparation will determine how long the wallpaper can remain in place and still be easily removed. A fair estimate for longevity is one to two years. Once the adhesive has hardened, or if the paper was installed in drier conditions, your surface may still require touch up after removal. To remove:
- Working backwards, begin at the top of the last panel that was installed
- Lift exposed corner with a knife edge
- Gently pull paper downward at 180 degrees, parallel to the wall surface
- Continue with a slow, steady force until you reach the bottom of the wall
- Repeat with remaining panels
- Dispose of old paper properly, as this paper is not recyclable
Pulling down on the paper, rather than pulling it away from the wall, will help reduce unnecessary removal of paint/primer.
See also: Wallpaper Terms
See also: How to Order Wallpaper